How to Make Shelf at Home: A Simple Method
How to Make Shelf at Home. Making shelves by yourself at home sure is satisfying. It’s like mixing practicality and your own flair. You want to tidy up, show off cool stuff, or just make your place look better, right? Well, building shelves yourself means you make them just how you need them. This all-in-one guide’s going to lay out a bunch of do-it-yourself shelving plans, what you need to build them, step-by-step how toms, and smart moves to make sure your shelf-making adventure works out and looks good.
Gains from Building Shelves Yourself
- Personalization: Fashion shelves that meet the exact size, style, and purpose needs of your space.
- Savings: Making shelves on your own often costs less than buying ready-made ones.
- Skill Growth: Tackling DIY projects improves your abilities in both woodworking and designing.
- Self-Fulfillment: There is a special kind of joy when you craft something both pretty and practical by hand.
Cool DIY Shelf Projects
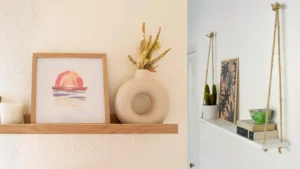
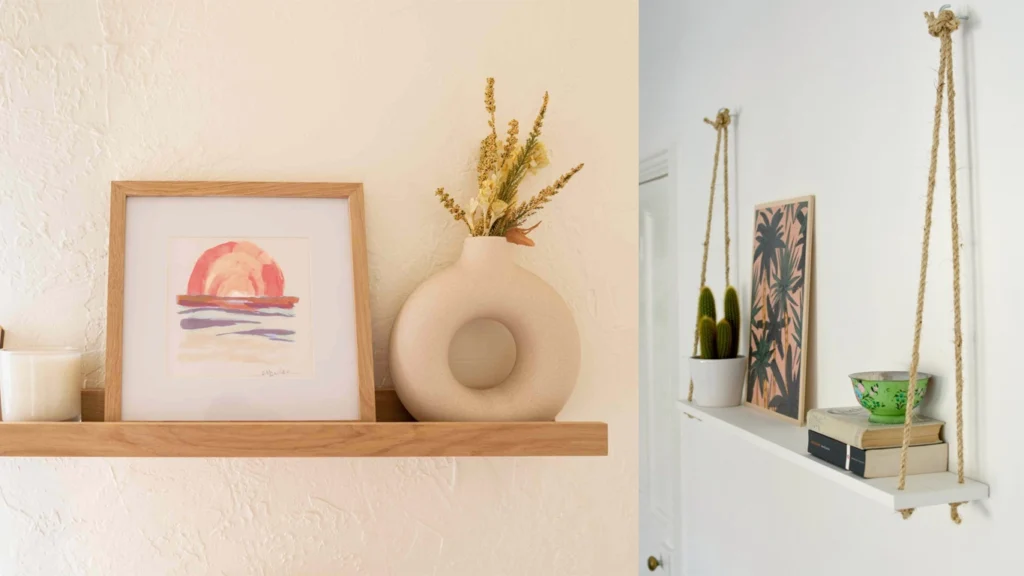
1. Floating Shelves
These types of shelves have a neat modern vibe since they seem to hang without any support showing. They work great for showing off books, pictures, or knick-knacks and don’t eat up any floor area.
Materials Needed:
- Grab some wooden boards to fit the shelf size you want
- Get yourself some wall anchors and screws
- A drill is a must-have
- Don’t forget a level
- Sandpaper comes in handy
- Paint or stain? That’s up to you
Instructions:
- Get your wooden board and size it up to how long you need it.
- Make that board smooth by sanding off the jagged bits.
- Slap some paint or stain on that board. Wait until it’s dry.
- Think about where you want your shelf to hang. Use a level to mark where the holes need to go for it to be straight.
- Make holes in the wall, pop in some wall anchors.
- Put the mounting bracket up there with screws so it stays put.
- Get the shelf on the bracket; make sure it doesn’t wobble.
Wanna know all the nitty-gritty on making floating shelves float? Check this guide out:
2. Pipe Shelves
- Mix up some tough industrial bits with cozy rustic wood, and boom, you’ve got pipe shelves. These cool additions bring a unique vibe to any space and are rock solid. They fit right in whether it’s your kitchen, washroom, or a cozy corner in the living room.
Materials Needed:
- Tough-looking industrial pipes and bits like flanges, elbows, and pipes
- Planks of wood
- Pointy screws
- Power drill
- Rough sandpaper
- Slick paint or fancy stain (if you want)
Instructions:
- Scrub those pipes till you get rid of any oily stuff or sticky labels.
- Put together the pipe holders linking flanges with elbows and pipes to shape them just right.
- Give the wooden planks a good sanding, and then either paint or smudge ’em with color as you like.
- On the wall, draw where you want those brackets to go, and make sure they’re not tipping over.
- Make some holes and fix the brackets onto the wall with screws.
To get your creative gears turning and see different styles of pipe shelves, peek at this collection:
3. Corner Shelves
- Corner shelves rock for making use of empty corner spots. They’re awesome for tinier rooms or flats since they give you extra storage and don’t hog your floor space.
Materials Needed:
- Planks of wood
- Angle supports
- Pointy metal fasteners
- Hole maker
- Tool to make sure things are straight
- Rough paper for smoothing
- Colored liquid or sinking sauce to make it look nice (if you want)
Instructions:
- Shape the wooden boards into triangles so they fit in the corner.
- Smooth out and apply the finish to the boards however you like.
- Fix L-brackets against the wall at your chosen heights for the shelves; make sure they’re straight.
- Place the triangle shelves on the brackets and nail them down with screws.
To get some cool ideas for corner shelves, peek at this write-up:
4. Crate Shelves
- Turning wooden crates into shelves gives you a storage space that’s both charming and practical. You can put them together in tons of different ways, so they’ll work for your room.
Materials Needed:
- Wooden crates
- Sandpaper
- Paint or stain up to you!
- Screws or nails
- Drill or hammer
Instructions:
- Smooth out the crates with sandpaper to get rid of any splinters.
- Slap some paint or stain on those crates if you like, and wait ’til they’re dry.
- Think about how you want to put the crates together on your wall or floor.
- Stick the crates to each other using those screws or nails.
- Wanna hang ’em up? Fix some brackets on the crate backs and nail them into the wall studs.
For a deep dive on making crate shelves, here’s where to go:
5. Ladder Shelves
- A shelving unit springs to life from an old ladder, injecting a classic vibe into your space. It’s a smart move to repurpose and whip up a standout item for your pad.
Materials Needed:
- A wooden ladder
- Planks of wood (as shelves)
- Sandpaper
- Some paint or stain (if you want)
- A bunch of screws
- A drill
Instructions:
- Prep the ladder by cleaning and smoothing with sandpaper for the finish.
- Slap on some paint or rub in stain on the ladder and wait for it to set.
- Saw some wood planks, so they’ll lay right across the ladder steps for shelving.
- Plop the planks down on the steps and screw them tight.
Conclusion:
Crafting your own shelf at home is both easy and fulfilling. It boosts both the usefulness and charm of any room. Pick your materials with care, peep some clear-cut how-to guides, and put your own spin on it with some cool finishes and knick-knacks. You’ll end up with a solid and snazzy place to stash your stuff. Plus, you’ll keep more cash in your wallet than if you copped a premade one, and you get the bragging rights for making a one-of-a-kind piece with your two hands.